![NinjaBatt Battery A1278 A1322 for Apple MacBook Pro 13"" [Mid 2012 2010 2009 Early 2011 Late 2011] - High Performance [76.56Wh/11.6Vv]](https://m.media-amazon.com/images/I/71pt63EoVvL.jpg)


🔋 Power Up Your Productivity!
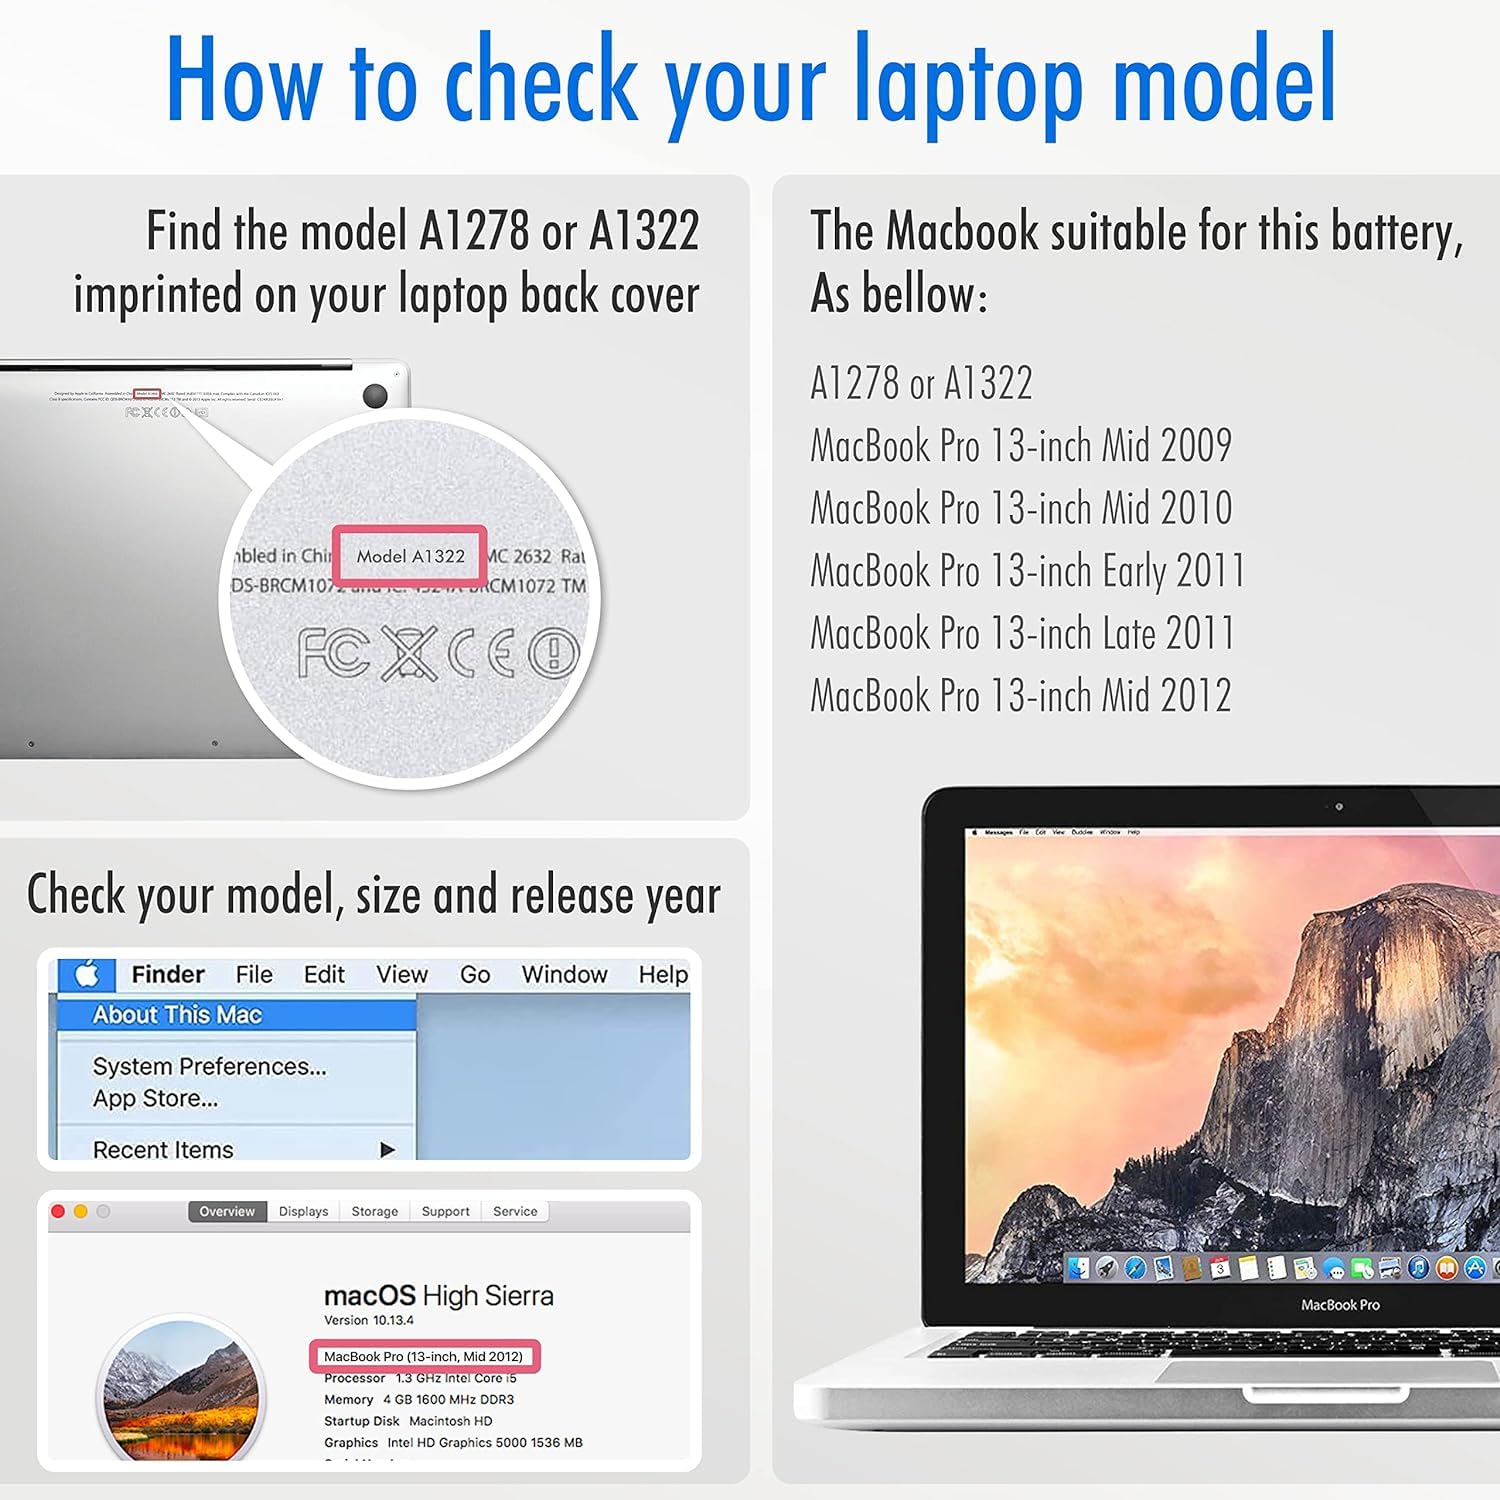
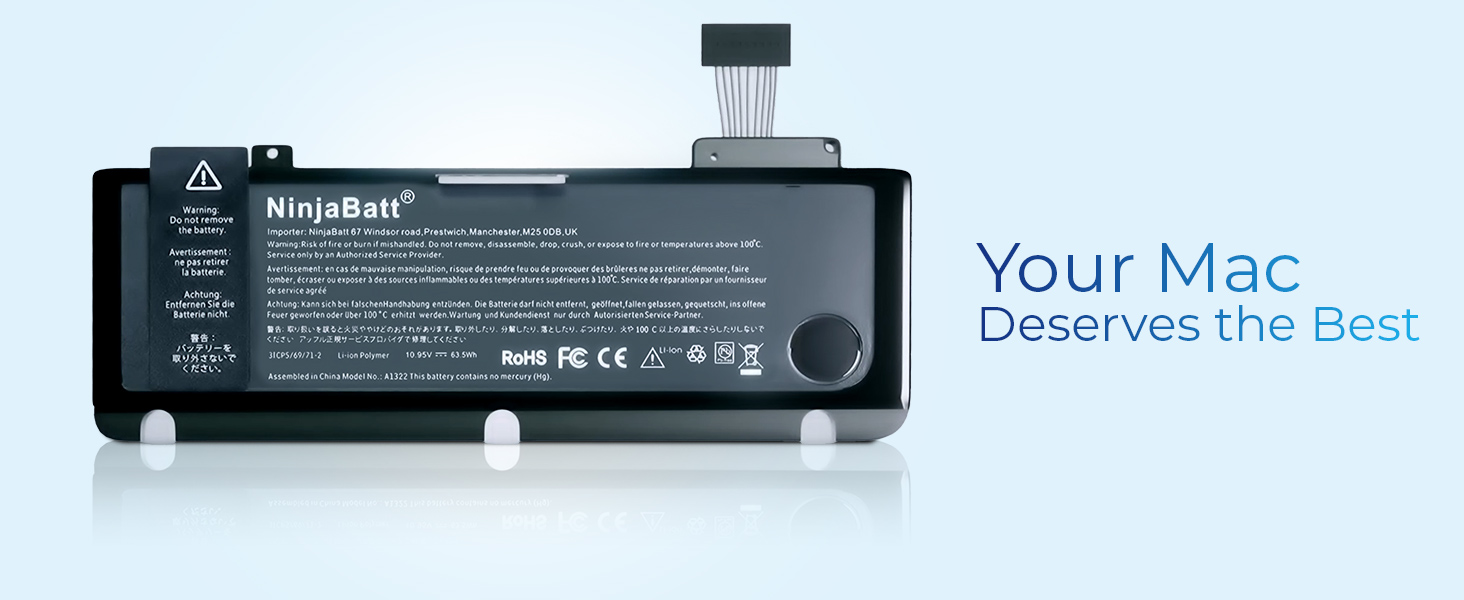
The NinjaBatt Battery A1278 A1322 is a high-performance replacement battery designed for various Apple MacBook Pro 13" models from 2009 to 2012. With a true charging capacity of 76.56Wh and a voltage of 11.6V, this lithium polymer battery ensures long-lasting power and reliability. It features a 12-month warranty and is built with top-quality materials, making it a dependable choice for professionals on the go.


| Item Dimensions | 10 x 5.7 x 1 inches |
| Item Weight | 10 Ounces |
| Battery Weight | 10 Ounces |
| Unit Count | 1.0 Count |
| Battery Cell Type | Lithium Polymer |
| Recommended Uses For Product | Laptop |
| Reusability | Rechargeable |
| Battery Capacity | 5800 Milliamp Hours |
| Voltage | 11.57 Volts |
J**K
Worked great.
I noticed that my 2013 Macbook Pro was starting to rock some when sitting on a flat, hard surface, seemed weird so after a little internet searching, I realized the batteries were starting to swell and distort the casing. My track pad, at least the ability to click it with my thumb, was also not working well. I ordered this replacement battery and received it quickly. There are other similar options out there, but they had additional added things, at additional cost, that I didn't feel I needed. I didn't install it right away, I waited another week or so, but I noticed that my cooling fan seemed to run more often than not, and the case was getting a little more deformed. I made sure I had a current backup performed, then shut all apps down, unplugged, and let the laptop since with the screen active until the batteries completely ran down and it shut itself off. The NijaBatt came with two small torx screwdrivers that matched the 10 case screws on the bottom cover of the laptop, and the two internal screws that hold down the battery connector. These screwdrivers worked fine, BUT they are not very good quality. Make sure you use the right one for each size screw; the case ones used the smaller size, the connector screws used the larger. That said, they look pretty similar in size to the naked eye, so test that they fit right carefully before attempting to remove the screws. You DO NOT want to strip out a screw head. The screws were not in that tight, but make certain you press the screwdriver in firmly as you gently twist them out. There's numerous Youtube videos showing others going through this process.Once the back cover is off, if your laptop is as old as mine, it's probably kinda dusty and gross inside. I used our house vacuum cleaner's hose with a small soft brush attachment to gently move over the internal components and remove most of the dust. NOTE: I DON'T KNOW IF THIS COULD CAUSE A STATIC SPARK, MAYBE, but it did not do so in my case, so no harm done. Perhaps using canned air is a better option...? Anyway, the next step is to unclip the multi pin connector that hooks the battery to the computer board. Only the top flat portion of this connector comes loose, not the entire thing hooked to the board. Mine was pretty tight and took some gentle prying with a non-metallic thingy. Don't try to pry up the whole little rectangular connector box because the bottom 2/3 is soldered in. SO far pretty easy. The hard part comes now. The battery is made of 6 linked sections. They are adhered on the underside to the aluminum case with some very strong sticky tape strips. WHY they need to be SO hard to remove is a mystery; there's not really anywhere for them to slide away into. I suspect it's just another Mac thing they do to discourage user interaction under the hood. According to my Youtube reference, isopropyl alcohol, applied around and between the battery sections will soften the adhesive. Well it did, but not quickly and you still need to pry up on the edges with a stick plastic thingy (some kits come with those) or old credit card, small plastic kitchen utensil. You do this prying slowly, letting the alcohol work in. I cut the outer battery sections loose (wire snips) after I got them up first BUT again, maybe not a great reco since the snips are metal and if your batteries still have some charge, you might make a nasty spark here. Be forewarned. AFter the batteries were finally out, I then use more alcohol to get rid of the left over tape strip residue; using a flat razor to lift the edges a bit then just pulling slowly with fingernails.OK, hardest part done. Try to soak up as much leftover alcohol as you can with little paper towel bits or Qtips. The rest will evaporate soon enough. With you new battery, set it in place WITHOUT removing the plastic adhesive covers. Don't fasten the screws yet, just check for a proper fir and make sure the two screw holes will line up nicely. The take it back out, remove the clear adhesive cover on the bottom and gently put it back in place, trying not to push down on it (and engage the adhesive) until you know the screw holes line up. Press the multi connector back in place, and install the 2 screws. press down on batteries gently to make sure they stick. NOTE the wires going from the battery to the connector have a little U-shaped curve to them. You may need to flex these a bit to make them sit as the old ones did. On my new battery, these wires, seen in the photo underneath the serial number sticker, stuck up a little higher than the originals, but I didn't want to force them down too much and risk damaging them, it did not affect closure of the case. Then remove the top side plastic cover on the batteries; I think this just is used to hold them steady together until installed. I checked that the laptop would them boot up OK, which it did, before shutting down again and closing it all up.The new battery charged up great and has been working flawlessly for about a week now. I do not use it on just battery power that often, so I cannot say just what kind of battery life it provides. The problem of a constant fan running has completely disappeared though and the case is no longer distorted.Dispose of the old batteries in accordance with local regs (public service announcement). As you can see, my old ones were bloated and in eminent danger of doing some serious damage to the laptop and surroundings, I should have done this repair even sooner.
L**N
It works!!
It works!! The installation went smoothly. I followed a video I found on YouTube and found it pretty easy to replace. My OG battery wasn’t charging and I couldn’t even use my laptop while plugged in or it would die on me. Apple wanted to charge me $300 for the battery replacement.I decided to purchase this battery due to the mostly good reviews I read. This was my first time changing a battery on a device. When I was done, the laptop wasn’t turning on and I thought it wasn’t going to work (disappointing!). However, I left it to charge for a little bit and within 20min or so the laptop turned on and battery was on 50%.It has been three days since I replaced it and I have not experienced any issues so far.
M**N
Terrible Replacement Battery - A Total Ripoff
I recently purchased the NinjaBatt replacement battery for my Macbook Pro, and the entire experience has been nothing short of a nightmare. I ordered this battery as a replacement for my swollen Macbook Pro battery, hoping for a seamless upgrade. However, the NinjaBatt has turned out to be a complete disappointment.Firstly, the installation process was the only positive aspect, as the battery shape exactly matched the original OEM battery, fitting well into place. Unfortunately, any glimmer of hope was swiftly crushed when I realized the battery was completely discharged upon arrival.Despite a seemingly straightforward charging process, my Macbook could only charge this battery to a mere 39% after a staggering 5 hours of charging. Even more concerning, the battery's charge dissipated at an alarming rate after unplugging the power source, far quicker than my original 9-year-old OEM battery.On the second charging cycle, the battery's performance further deteriorated, and I could only achieve a laughable 27% charge. It's abundantly clear that this battery is not only defective but also boasts a significantly smaller capacity than the original OEM battery.This experience has left me questioning the legitimacy of NinjaBatt's products. Whether it's a blatant scam or a result of abysmal quality control, I am utterly disappointed and frustrated. I strongly advise against wasting your money on this product. Save yourself the trouble and opt for a more reliable battery from a reputable source.I am beyond frustrated with this purchase, and to add insult to injury, attempting to return this defective battery is an absolute nightmare. The battery is glued to the case, making the return process an arduous and messy ordeal. Save yourself the headache and steer clear of this subpar product and its infuriating return process.
Trustpilot
1 week ago
1 month ago

![NinjaBatt Battery A1278 A1322 for Apple MacBook Pro 13"" [Mid 2012 2010 2009 Early 2011 Late 2011] - High Performance [76.56Wh/11.6Vv]](https://images-na.ssl-images-amazon.com/images/I/71pt63EoVvL._AC_UL116_SR116,116_.jpg)